For this guide i will take you through one of my conkies that I use to display some system information on my desktop at all times. If you have not already installed it then it can be done easily with this command for Debian based Distributions :-
sudo apt-get install conky-all
This will install a few other packages as well which are needed for the best results. Once installed you could simply type conky into a terminal to see the default layout on your desktop, this will look something like this :-
 Pretty uninspiring but it does give you some basic information. What we are going to do is create our own conky with a little colour/formatting and positioning to make it appear better on the desktop.
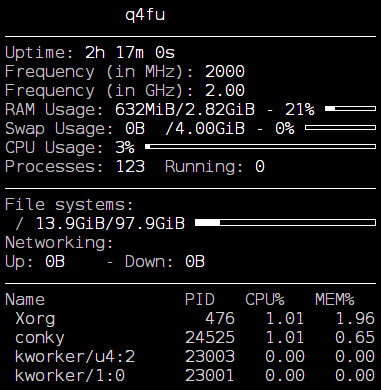
We could start by copying the default layout (/etc/conky/conky.conf) to our home folder and edit that, but what I am going to do is take you though one of mine line by line with some information about how I configured it and displayed it to my preferences. This is the conky I will be using as the example :-
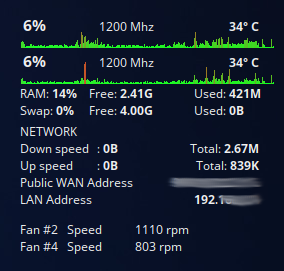 I often have more than one conky running and each can have it’s own “refresh rate” so rarely changing information can go in a separate file to be refreshed less often saving your computer resources. This conky shows my cpu, memory and basic network information along with my fan speeds.
If you want to follow this guide open a new text document in your favourite text editor and save it as testconky and I will use that for this example
The first thing we need to do is open the config section with
conky.config = {
The first variable I use is to set the refresh rate
update_interval = 1,
This will refresh the displayed information every 1 second and can be set to fractions of a second but that would be too much for this conky.
The next line states how many times conky will refresh, I leave this set to 0 which means to run forever.
total_run_times = 0,
this next line sets the location I want it to be displayed.
alignment = "top_right",
This can be set to one of nine options :-
- top_left (or tl)
- top_middle (or tm)
- top_right (or tr)
- middle_left (or ml)
- middle_middle (or mm)
- middle_right (or mr)
- bottom_left (or bl)
- bottom_middle (or bm)
- bottom_right (or br)
Next I can fine tune the position of the conky using the gap_x and gap_y options, I have mine set to :-
gap_x = 10,
gap_y = 15,
Now I set the minimum and maximum sizes for the conky, this is not always necessary as you can have conky resize to fit whatever data you are displaying but for this guide I will have my size static.
minimum_width = 254,
minimum_height = 250,
maximum_width = 254,
By setting the minimum and maximum width to the same value I can be sure the conky will always be the same width, the height can be set to a minimum value but it will grow according to the data you put in the text area.
The next line is usually a requirement to prevent flickering of the conky and I always include it.
double_buffer = true,
These next two lines can be set to give you a more averaged display of your cpu and network statistics, I prefer to read the current exact value but sometimes you might want the average of the last 2 or 3 readings, if this is what you want then set the value to the number of readings to average.
net_avg_samples = 1,
cpu_avg_samples = 1,
These next group of lines allow you to set the window options.
own_window = true,
own_window_type = "normal",
own_window_hints = "undecorated,below,sticky,skip_taskbar,skip_pager",
own_window_transparent = true,
own_window_argb_visual = true,
own_window_argb_value = 0,
- use it’s own window
- declare the type of window as normal
- remove header bar and frame, set it below other (normal) windows, keep it on all desktops (if you use multiple desktops), and prevent conky from showing in the taskbar and pager(alt-tab)
- make the background of window transparent
- use argb settings (sometimes needed for transparency)
- set the argb transparency value
Now we set what we want as the default font and it’s size, you could also set if you want it to be bold etc.
use_xft = true,
font = "DejaVu:size=9",
If you wanted the default font bold you could use this line
font = "DejaVu:bold:size=9",
The next line set the display of sizes and speeds to a more human readable value, that is it will display as bytes, kilobytes, megabytes, gigabytes and probably terabytes too but I haven’t tested that as I only use my large devices for backups and all my working systems are 500Gb or less.
short_units = true,
And finally for this section I set the graph borders off, although when I am setting the visual layout I have them set to show (just put — at the beginning of the line to make it a comment) to allow me to precisely locate them where I want them to be.
draw_graph_borders = false
The last thing we must do for the config section is to close it, this is simply a matter of adding the closing parenthesis to match the one that started this section.
}
There are many more options available to be entered here, but these are the ones I use most of the time. If you want to see some of the other options refer to the manual (man conky) which contains the full list with short explanations.
Now we are ready to start adding some information for our conky to display, To continue please read Building a conky Part 2